lighting

Welcome everybody!                                 
Last time I made something for outlook of my game. Previously  I was able to darken environment via manually setting color per each vertex, now besides that, I can also specify global ambient color which is darkening level. Furthermore, it is possible to attach light spot to any object on scene, then every objects that are in certain radius from light are illuminated. Additionally, I implemented shadow casting algorithm basing on this article. But let’s start from the beginning, general recipe for that effect looks pretty simple:

1. Clear screen with ambient color
2. For each lightgradient
     a) set drawing only to alpha channel
     b) remove existing on screen alpha channel
     c) set blending to additive
     d) for each object near light: render shadow using only alpha color
     e) set drawing only to r g b channels
     f) render light only where, there is no shadow
3. copy light-map  existing  on screen to texture
4. clear screen
5. draw scene normally
6. set multiplicative blending ( wherever light-map is black  there will be dark)
7. draw quad with dimensions of  screen textured with light-map
8. bonus:  if emissive light needed draw it again with additive blending

Re 2.f

just draw quad with light gradient texture like image on right, you may also change light color by glColor…

Re 1, 2.b and 4

in opengl we can clear screen by using glClear(GL_COLOR_BUFFER_BIT)  function as long in this case we aren’t using depth and stencil buffers. Additionally  we can set global ambient color via  glClearColor(ambientR,ambientG,ambientB,0.f);  so it will immediately fill screen with wanted color

Re 2.a 2.e

setting true or  false in parameters enables or disables drawing to that channel  glColorMask(red,green,blue,alpha); Re 3 we can copy pixels to texture by using glCopyTexSubImage2D function or… we can skip this point if we previously set rendering directly to texture via FrameBufferObjects (FBO) then we can avoid copping pixels from  screen to texture. It seems to be large optimization, In by case glCopyTexSubImage2D works faster than FBO and everywhere people are writing that it should be slower. I don’t know why this is so. I suspect that it can be because my old integrated graphics card (intel GMA X3100)

Re 2.c 2.f and 6

blend function so the way how existing color of pixel and currently drawing is mixed we can set by glBlendFunc(enum ,enum) it is still bit confusing to me but I understood couple of setups

  • multiplicative: previous color * actual color  = glBlendFunc(GL_DST_COLOR, GL_ZERO)
  • additive: previous color + actual color =  glBlendFunc(GL_ONE, GL_ONE)
  • drawing inversely proportional to amount of alpha =  glBlendFunc(GL_ONE_MINUS_DST_ALPHA, GL_ONE)

Note: this lighting system was done without any shaders,  only pure OpenGL with fixed pipeline. The essence is to know how to generate light texture and using appropriate blending functions

2.d is most complicated step. It consist in drawing shadows only with alpha set to 1.0. Firstly my must find all overlapping objects with light, I have done that by comparing axis aligned bounding boxes. Then for each vertex in found object we must calculate vector from light, next we perform dot product on it and object edge normal to determine if this vertex is necessary to cast shadow. After that,  draw each found vertex and vertex casted outside light. As performance optimization we can set glScissor test to save some fill rate.

Particle effects

Hello

At the beginning I want to say that approach mentioned here in my earlier post – so creating sequences of frames consisting for full animation of explosion was totally wrong. After creating one explosion animation in ExploTexGen or Particle Illusion, I wanted to have more of these. So simply I started to create another fixed animations. What was th result? TGA files weighing over 2MB each with poor scalability and repeatable look. It wasn’t too efficient way to produce graphics effects. Additionally, I spent a lot of time on creating, exporting and transforming to looping animation.

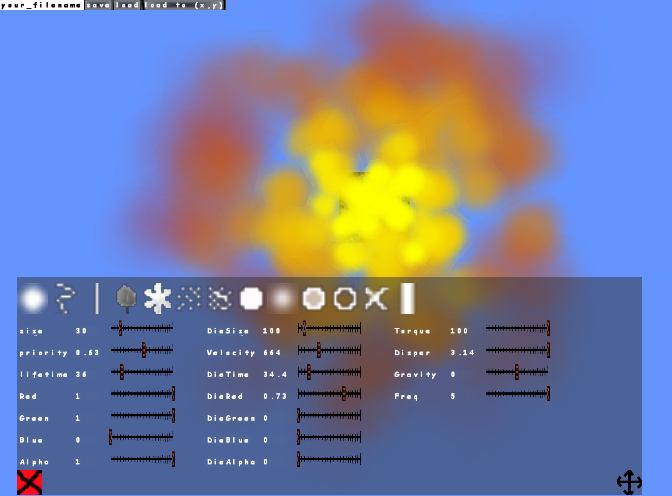
So, I decided to create my particle system which could create various effects. Firstly I was thinking that I can use Bullet physics engine to simulate particles without collision. But then, I found that Bullet is calculating too much – too much for simple movement with gravitation, without any collision response. So I am calculating trajectory of  particles by myself. Each particle emitter has 20 parameters which determine appearance of spawned particles. most important of them are:

  • size of particle ( more precisely it is side length of textured square )
  • texture – it can be really small, I’m using 8×8 and 16×16 pixels
  • color – RGBA  begin values
  • lifeTime -as the name suggests, it is time after which particle is removed
  • dieTime – time after which particle begins to die, so it’s color and size starts interpolating to dieColor and dieSize
  • frequency – amount of particles

Full options visible on screenshoot.

It can be used for simulating things like:

  • fire
  • smoke
  • wind steams
  • rain, snow
  • explosion
  • blood
  • falling leaves from trees
  • spells, sparks
  • teleports
  • magic areas
  • waterfalls
  • fountains

As well as lot of other things which I can’t now come up with. What is important is that these various effects are produced / simulated in the same way but with different parameters ( so, logic for falling leaves is the same like in simulating fire or gas steam but final effect is totally different). Moreover, the design of new graphical effects is fast as hell. All particle emitters shown in the video bellow were created in less than 15 minutes. Of course everything is integrated in my world editor (new section added)

On video You can see examples of particle emitters and at the end – gas stream which is also forcefield and source of sound

Physical sound – how to

update: also available in Polish (slides) Bullet i dźwięki pdf

I decided to create short tutorial about physics based sound. In previous post video you was able to hear my audio. Now I would like to share my short conception with you. Example written in bullet physics engine.

Of course the only way to determine collisions is to search contacts points used by physics engine. But contact points aren’t obvious. We must to check if they meet interesting for us conditions. Currently  I am using two physics sounds:

Impact sound

It should be played when some object hits other object. Typically this is short, loud sound dependent on the materials which objects are made of. Browsing contacts should be done after stepSimulation method defined in collisionWorld class if you have implemented fixed time step physics (see fix-your-timestep article) if you don’t, you can do it using bullet’s internal tick callback.

So you probably want to play “hit” sound when contact point meets this contitions (they work well for me)

  • object really collide with other so contact point distance is less then zero
  • hitting force reaches certain threshold (you must try which is best for you)
  • optionally lifetime of contact point  = 1, so it is just created (I have this condition just in case)

Scratching sound

When some object is sliding on other. It also could depend on objects materials and as extension it can also depend on object sliding velocity (of course if you have such option in your sound library). If greater velocity then sound pitch (frequency) should be greater. Such action will give realism to the sound, like in real world. Here are my conditions for sliding sound effect:

  • length of difference of two object velocity vectors greater than some  small amount (depends on your physics world scaling). Vectors difference is needed to ensure that object is really sliding, this also prevents situation when one object is at rest on another moving object. In this case sliding sound shouldn’t be played, all two object have some velocity, but relatively to each other they aren’t moving and difference of this objects velocities is of course 0
  • contact point distance is less than small value but greater than zero, so one object is located on second

My code example ( magic values works for me, but i have the world scaled by 64 ):

[sourcecode language=”cpp”]
for (int i=0;i< dynamicsWorld->getDispatcher()->getNumManifolds();i++)
{
btPersistentManifold* contactManifold = dynamicsWorld->getDispatcher()->getManifoldByIndexInternal(i);
for(int t=0;tgetNumContacts();++t)
{
auto point=contactManifold->getContactPoint(t);
if(point.getDistance()<-0.5f && point.getLifeTime()==1 && point.getAppliedImpulse()>100.f)
{
//play impact sound
}else
if(((contactManifold->getBody0()->getLinearVelocity()-contactManifold->getBody1()->getLinearVelocity()).length()>4.f) && point.getDistance()<1.5f )
{
//play sliding sound
}
}
}
[/sourcecode]

This easy, short code can really improve audio of your applications. There is still issue – how to play this sounds. I’m using such rules: For impact sound, I’m just playing it on first available channel. For sliding sound I’m using resume / pause method, but You can handle it yourself.